API layers SVG support

The API layers endpoint now supports SVG images. This comes with great advantages for developers.
The power of SVG
SVG is an XML-based vector image format, where XML is human-readable text.
Define drawing objects and use it with the Eyeson API. The actual image is created on our server, so the whole process of creating, sending and drawing the overlay is way faster than before.
In other words:
- Significantly smaller file sizes
- Text-based format that can be edited with code editors
- Original quality in contrast to compression of PNG, WebP, etc.
Rules
SVG files are rendered on server side and applied immediately as overlay or background.
- Width and height must be set on the SVG element
- Maximum size is 1280x960 pixels (or 1280x720px in widescreen mode)
- Only "DejaVu Sans" font in normal and bold is supported and the default
<?xml version="1.0" ...is optional- No external URLs - use data URIs if needed
- No animations, only static SVG subset is supported
Example SVG
Here's a simple example with some object and text elements.
<svg xmlns="http://www.w3.org/2000/svg" width="400" height="225">
    <rect x="0" y="0" width="400" height="225" fill="#3C1C88" />
    <circle cx="200" cy="112" r="100" fill="none" stroke="#6C3FFF" stroke-width="20" />
    <text x="200" y="112" font-size="50" font-weight="bold" fill="#ffffff" text-anchor="middle">LOREM IPSUM</text>
    <text x="200" y="112" dy="40" font-size="30" letter-spacing="8" fill="#AA99FF" text-anchor="middle">dolor sit amet</text>
</svg>
Using SVG files with Eyeson API
The API layers endpoint parameters url and file are now ready to be used with SVG files in addition to PNG and other image file formats.
Provide a public URL
- curl
- node sdk
- go sdk
- php sdk
curl -X POST \
  -d "url=https://docs.eyeson.com/img/examples/overlay_example.svg" \
  "https://api.eyeson.team/rooms/$ACCESS_KEY/layers"
import Eyeson from '@eyeson/node';

const eyeson = new Eyeson();
const user = await eyeson.getUser('ACCESS_KEY');
await user.setLayer({ url: 'https://docs.eyeson.com/img/examples/overlay_example.svg' });
import (
  eyeson "github.com/eyeson-team/eyeson-go"
)
accessKey := "..."
userService, _ := eyeson.NewUserServiceFromAccessKey(accessKey)
userService.SetLayer("https://docs.eyeson.com/img/examples/overlay_example.svg",
  eyeson.Foreground, nil)
use EyesonTeam\Eyeson\Eyeson;

$eyeson = new Eyeson('');
$layer = $eyeson->layer('ACCESS_KEY');
$layer->setImageUrl('https://docs.eyeson.com/img/examples/overlay_example.svg');
Send SVG file as binary
- curl
- node sdk
- go sdk
- php sdk
curl -X POST \
  -F "file=@path/to/local/file.svg" \
  "https://api.eyeson.team/rooms/$ACCESS_KEY/layers"
Using pipe:
echo '<svg xmlns="http://www.w3.org/2000/svg" ...' | \
curl -X POST \
    -F "file=@-;filename=upload.svg" \
    "https://api.eyeson.team/rooms/$ACCESS_KEY/layers"
import fs from 'node:fs';
import Eyeson from '@eyeson/node';

const eyeson = new Eyeson();
const user = await eyeson.getUser('ACCESS_KEY');
const svg = await fs.promises.readFile('./demo.svg', { encoding: 'utf8' });
await user.sendLayer(svg);
import (
  "os"
  eyeson "github.com/eyeson-team/eyeson-go"
)
userService, _ := eyeson.NewUserServiceFromAccessKey("ACCESS_KEY")
buffer, _ := os.ReadFile("./demo.svg")
userService.SetLayerImage(buffer, eyeson.SVG, eyeson.Foreground, nil)
use EyesonTeam\Eyeson\Eyeson;

$eyeson = new Eyeson('');
$layer = $eyeson->layer('ACCESS_KEY');
$layer->sendImageFile('./demo.svg');
You can find more examples in the How to use SVG files in Eyeson article.
Node.js SVG Plugin
For convenience and more powerful applications we've created a node.js plugin. It provides text size calculation functions, multiline text boxes, and much more.
https://github.com/eyeson-team/eyeson-node-svg-layer
Install plugins with NPM
npm i --save @eyeson/node @eyeson/node-svg-layer
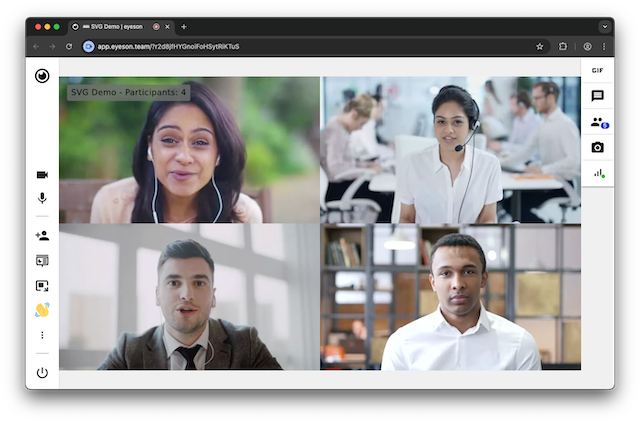
Advanced example with dynamic meeting info
The following example demonstrates dynamic overlay creation with realtime data. It uses the Meeting Observer to show the actual number of participants as an overlay.
import Eyeson from '@eyeson/node';
import EyesonSvgLayer from '@eyeson/node-svg-layer';

const eyeson = new Eyeson({ apiKey: '...' });
const overlay = new EyesonSvgLayer();
const infoBox = overlay.addTextBox('', 20, false, '#000', 20, 20, 'top left', 10, null, 3, 'grey 80%');
const meeting = await eyeson.join('...');
const connection = eyeson.observer.connect(meeting.roomId);
let participantCount = 0;
connection.on('event', event => {
    if (event.type === 'room_update') {
        participantCount = event.content.participants.length;
        if (event.content.ready) {
            updateOverlay();
        }
    }
    else if (event.type === 'participant_update') {
        if (event.participant.online) {
            participantCount++;
        } else {
            participantCount--;
        }
        updateOverlay();
    }
});
const updateOverlay = async () => {
    infoBox.text = `${meeting.data.room.name} - Participants: ${participantCount}`;
    await meeting.sendLayer(overlay);
};
Resulting SVG:
<svg xmlns="http://www.w3.org/2000/svg" width="1280" height="720" font-family="DejaVu Sans,sans-serif">
    <rect x="20" y="20" width="302" height="40" rx="3" fill="grey" fill-opacity="80%" />
    <text x="30" y="31" font-size="20" fill="#000" dominant-baseline="hanging">SVG Demo - Participants: 4</text>
</svg>
Contact
We'll be happy to hear from you!
If you have a question or want to share any feedback, do not hesitate to create a ticket on GitHub.