How to Use SVG Files in Eyeson
The layers endpoint fully supports PNG and WebP formats, with SVG files being the newest supported format. SVG offers several advantages compared to other image formats:
- Significantly smaller file sizes
- Text-based format that can be edited with code editors
- Original quality in contrast to compression of PNG, WebP, etc.
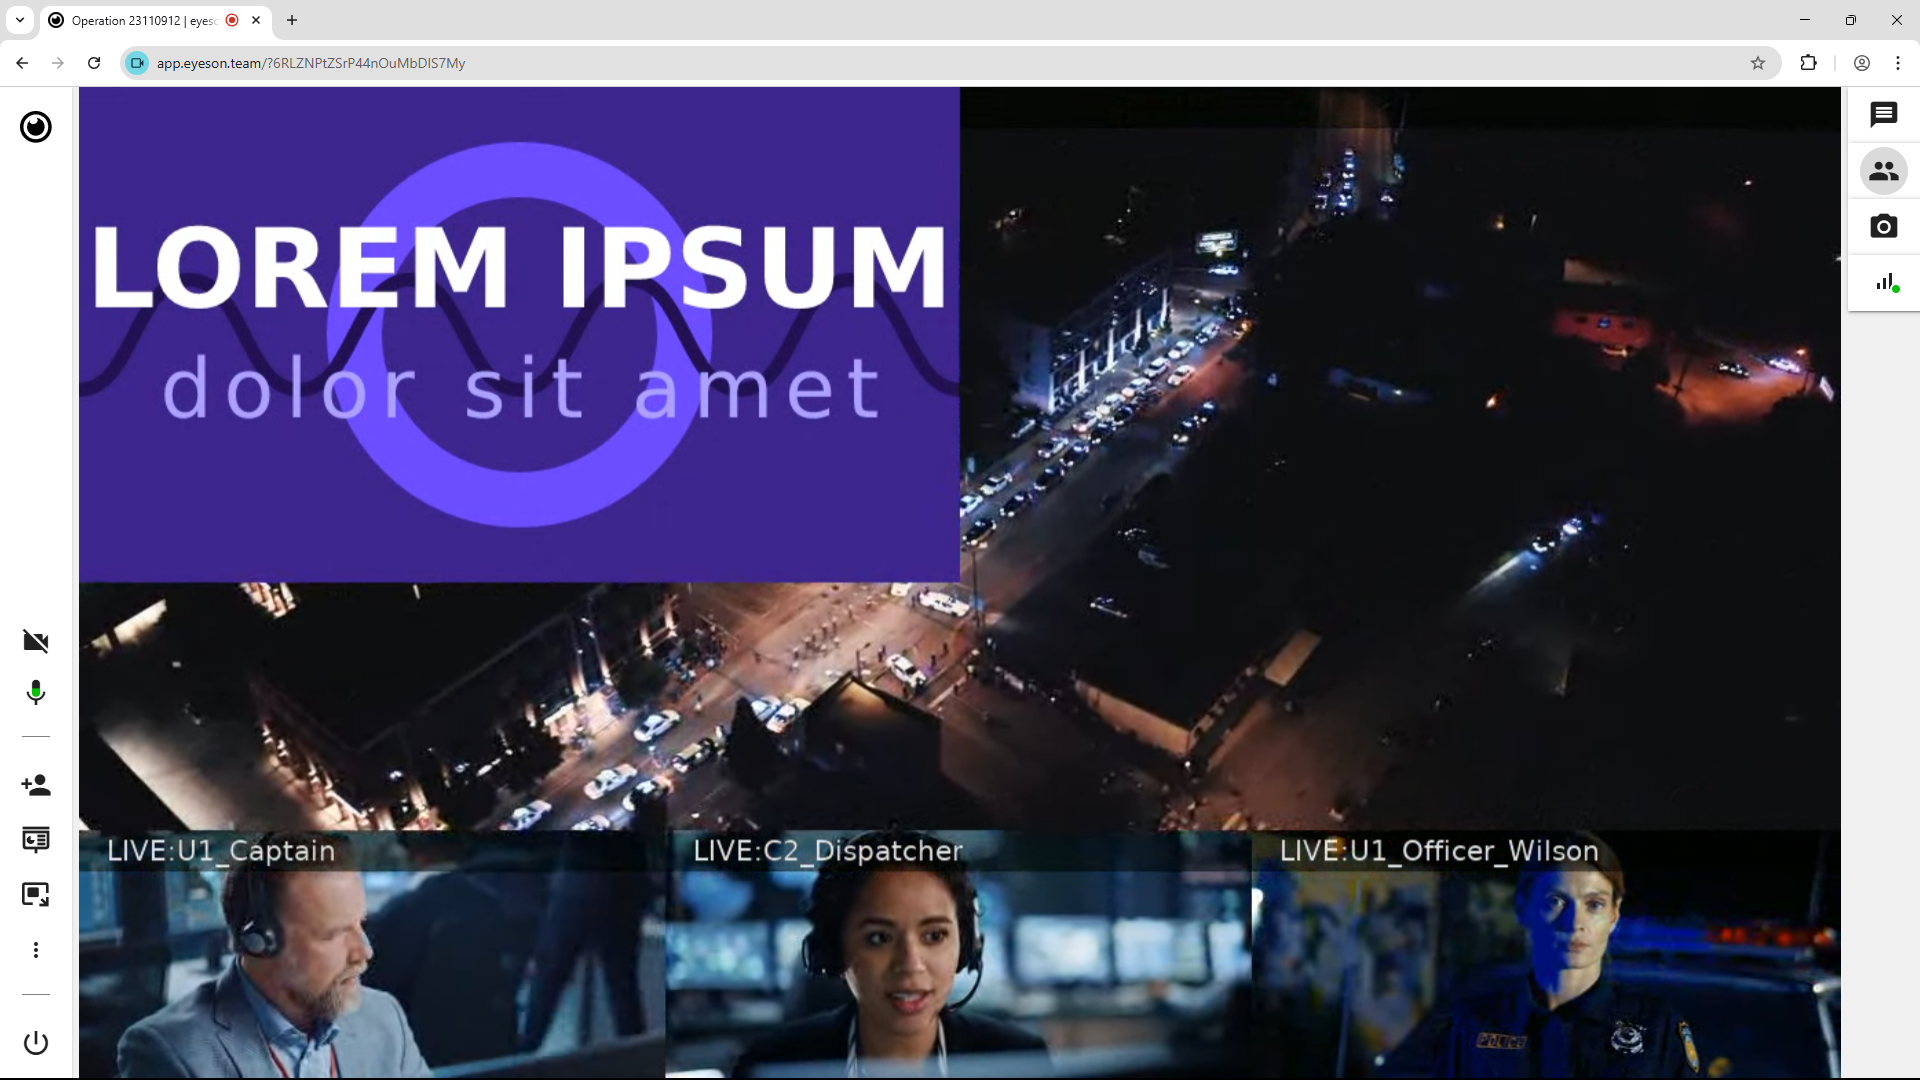
SVG Example
SVG images can be created rapidly when working with simple content. For instance, creating text overlaid on a colored rectangle with additional geometric shapes requires only a few lines of code. The text-based nature of SVG allows for straightforward editing and quick implementation in your projects.
<svg id="image" xmlns="http://www.w3.org/2000/svg" width="640" height="360" font-family="DejaVu Sans, sans-serif">
    <rect x="0" y="0" width="640" height="360" fill="#3C1C88" />
    <circle cx="320" cy="180" r="120" fill="none" stroke="#6C3FFF" stroke-width="40" />
    <path d="M 0 220, C 40 220, 40 140, 80 140, C 120 140, 120 220, 160 220, C 200 220, 200 140, 240 140, C 280 140, 280 220, 320 220, C 360 220, 360 140, 400 140, C 440 140, 440 220, 480 220, C 520 220, 520 140, 560 140, C 600 140, 600 220, 640 220" stroke-width="10" stroke="#200C50" fill="none"/>
    <text x="320" y="160" font-size="80" font-weight="bold" fill="#ffffff" text-anchor="middle">LOREM IPSUM</text>
    <text x="320" y="160" dy="80" font-size="60" letter-spacing="10" fill="#AA99FF" text-anchor="middle">dolor sit amet</text>
</svg>

This capability enables developers to create sophisticated overlays using just a few lines of code, streamlining the workflow for dynamic content generation without requiring external graphic design software. SVG technology allows for efficient visualization of data and information in any context where visual elements need to be overlaid on video content.
Methods for Using SVG in Eyeson
There are multiple ways to use SVG files in Eyeson.
Public File URL
The most straightforward method for displaying an overlay in Eyeson is by providing a public image URL. This approach allows you to reference SVG files hosted on publicly accessible servers.
- curl
- node sdk
- go sdk
- php sdk
export ACCESS_KEY=...
curl -X POST \
  -d "url=https://docs.eyeson.com/img/examples/how_to_svg_example1.svg" \
  -d "z-index=1" \
  "https://api.eyeson.team/rooms/$ACCESS_KEY/layers"
const accessKey = '...';
const eyeson = new Eyeson();
const user = await eyeson.getUser(accessKey);
await user.setLayer({
  url: 'https://docs.eyeson.com/img/examples/how_to_svg_example1.svg',
  'z-index': 1,
});
accessKey := "..."
userService, _ := eyeson.NewUserServiceFromAccessKey(accessKey)
userService.SetLayer("https://docs.eyeson.com/img/examples/how_to_svg_example1.svg",
  eyeson.Foreground, nil)
$accessKey = '...';
$eyeson = new Eyeson();
$layer = $eyeson->layer($accessKey);
$layer->apply([
  'url' => 'https://docs.eyeson.com/img/examples/how_to_svg_example1.svg',
  'z-index' => 1
]);
Local File
Alternatively, you can upload a local SVG file directly to the Eyeson API. This method is useful when you have SVG files stored on your local machine or when you need to generate SVGs dynamically before sending them to Eyeson.
- curl
- node sdk
- go sdk
- php sdk
export ACCESS_KEY=...
curl -X POST \
  -F "file=@path/to/local/file.svg" \
  -F "z-index=1" \
  "https://api.eyeson.team/rooms/$ACCESS_KEY/layers"
import fs from 'node:fs';
import Eyeson from '@eyeson/node';

const file = './path/to/local/file.svg';
const accessKey = '...';
const eyeson = new Eyeson();
const user = await eyeson.getUser(accessKey);
const buffer = await fs.promises.readFile(file);
await user.sendLayer(buffer, 1);
import (
  "os"
  eyeson "github.com/eyeson-team/eyeson-go"
)
accessKey := "..."
userService, _ := eyeson.NewUserServiceFromAccessKey(accessKey)
buffer, _ := os.ReadFile("./path/to/local/file.svg")
userService.SetLayerImage(buffer, eyeson.PNG, eyeson.Foreground, nil)
$file = './path/to/local/file.svg';
$accessKey = '...';
$eyeson = new Eyeson();
$layer = $eyeson->layer($accessKey);
$layer->sendImageFile($file, 1);
Terminal Command
For situations where you prefer a command-line approach without managing image files separately, you can create and upload SVG content directly from your terminal using a single command. This method enables efficient workflow by combining SVG creation and submission in one operation.
export ACCESS_KEY=...
echo '<svg id="image" xmlns="http://www.w3.org/2000/svg" width="1280" height="720" font-family="DejaVu Sans, sans-serif"> \
  <rect x="0" y="0" width="640" height="360" fill="#3C1C88" /> \
  <circle cx="320" cy="180" r="120" fill="none" stroke="#6C3FFF" stroke-width="40" /> \
  <path d="M 0 220, C 40 220, 40 140, 80 140, C 120 140, 120 220, 160 220, C 200 220, 200 140, 240 140, C 280 140, 280 220, 320 220, C 360 220, 360 140, 400 140, C 440 140, 440 220, 480 220, C 520 220, 520 140, 560 140, C 600 140, 600 220, 640 220" stroke-width="10" stroke="#200C50" fill="none" />  \
  <text x="320" y="160" font-size="80" font-weight="bold" fill="#ffffff" text-anchor="middle">LOREM IPSUM</text> \
  <text x="320" y="160" dy="80" font-size="60" letter-spacing="10" fill="#AA99FF" text-anchor="middle">dolor sit amet</text> \
</svg>' | \
curl -s -X POST \
  -F "file=@-;filename=upload.svg" \
  "https://api.eyeson.team/rooms/$ACCESS_KEY/layers"
Send Binaries
In this JavaScript example, we utilize the SVG code from the SVG Example section above to create and send an SVG file directly to the Eyeson API. This approach demonstrates how to convert an SVG element from your DOM into a binary format suitable for transmission to the layers endpoint.
const svg = document.getElementById('image').outerHTML; // converts the html to string
const sendImage = async () => {
  try {
    const access = "...";
    const url = `https://api.eyeson.team/rooms/${access}/layers`;
    const blob = new Blob([svg.trim()], { type: "image/svg+xml" }); // converts trimmed string to binary
    const formData = new FormData();
    formData.set("file", blob, "overlay.svg");
    formData.set("z-index", "1");
    const response = await fetch(url, { method: "POST", body: formData });
    if (!response.ok) {
      throw new Error("Failed to send image");
    }
  } catch (error) {
    alert(error.message);
  }
};
Node.js Solution
There is also a Node.js plugin to define and create overlay or background SVG layer to use with eyeson-node.
npm install --save @eyeson/node @eyeson/node-svg-layer
import Eyeson from '@eyeson/node';
import EyesonSvgLayer from '@eyeson/node-svg-layer';

const accessKey = '...';
const eyeson = new Eyeson();
const layer = new EyesonSvgLayer();
layer.addRect(0, 0, 640, 360, 0, '#3C1C88');
layer.addCircleOutline(320, 180, 120, 40, '#6C3FFF');
layer.addText('LOREM IPSUM', 80, true, '#FFF', 320, 160, 'middle');
layer.addText('dolor sit amet', 60, false, '#AA99FF', 320, 240, 'middle');
const user = await eyeson.getUser(accessKey);
await user.sendLayer(layer, 1);
Result
Regardless of which implementation method you choose, the final result will display your SVG overlay in the Eyeson video meeting as shown in the example below. Each approach produces the same visual outcome while offering different integration workflows to suit your development environment and requirements.