Dynamic layer creation with eyeson-node-layer

Define your overlay and background layer with dynamic content and let the library create the image for you on-the-fly.
https://github.com/eyeson-team/eyeson-node-layer
Introduction
The Eyeson Layer API offers 2 different ways of usage:
file... binary data of an imageurl... public URL to an image file
Eyeson-node-layer is based on "canvas for node" and so it provides many functions to draw on a canvas in the background and get its image binary data for using Layer API via its file option.
In this post I want to introduce eyeson-node-layer and it's numerous ways to dynamically show data in any Eyeson meeting.
In order to start a meeting, you have to use an API key. If you don't have it already, here's how to get your API key
Setup
Add eyeson-node-layer to your Node project via npm or yarn. It makes sense to combine it with eyeson-node to apply created layers directly in the meeting.
- npm
- Yarn
$ npm i --save @eyeson/node @eyeson/node-layer
$ yarn add @eyeson/node @eyeson/node-layer
To make it comfortable, eyeson-node v1.2.0 has added a function sendLayer() to send image buffer or even EyesonLayer directly.
import Eyeson from '@eyeson/node';
import EyesonLayer from '@eyeson/node-layer';

const eyeson = new Eyeson({ apiKey: '<YOUR API-KEY>' });
const layer = new EyesonLayer();
// layer.addText, addImage, addRect, etc.
const user = await eyeson.join('<USERNAME>');
await user.sendLayer(layer);
The complete list of functions is documented in the README file.
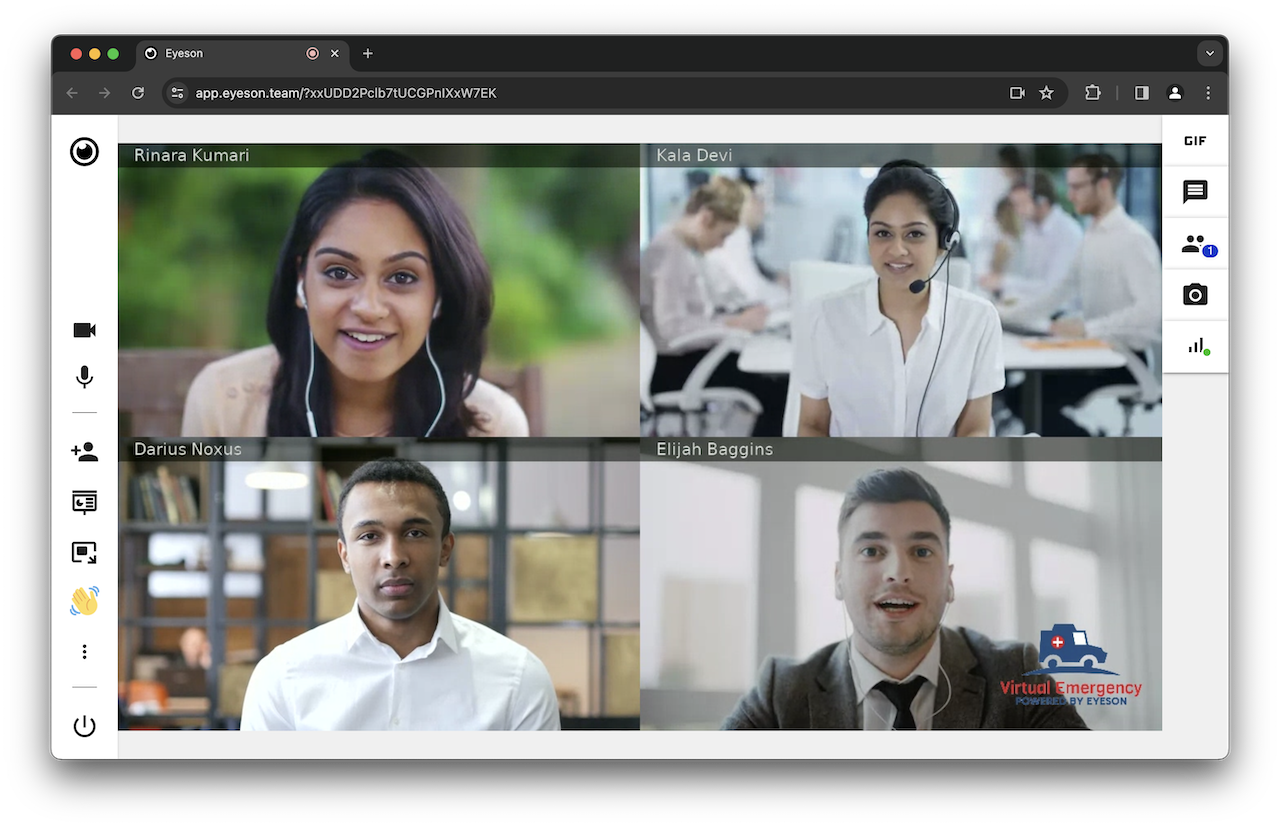
Example watermark with your logo
With loadImage() and addImage() it is very easy to include a logo image and place it on your desired position.
In this example, the image is scaled to 15% of the video width and placed on the bottom right corner.
import Eyeson from '@eyeson/node';
import EyesonLayer from '@eyeson/node-layer';

const eyeson = new Eyeson({ apiKey: '<YOUR API-KEY>' });

const createWatermark = async logoSource => {
    const layer = new EyesonLayer({ widescreen: true });
    const logo = await layer.loadImage(logoSource);
    const margin = 15;
    // 15% of layer width
    const logoWidth = Math.round(layer.width / 100 * 15);
    const logoHeight = logoWidth / logo.width * logo.height;
    // put image in bottom right corner
    const logoX = layer.width - margin - logoWidth;
    const logoY = layer.height - margin - logoHeight;
    await layer.addImage(logo, logoX, logoY, logoWidth, logoHeight);
    return layer;
};

const run = async () => {
    const user = await eyeson.join('<USERNAME>');
    const watermark = await createWatermark('./images/virtual_healthcare.png');
    await user.sendLayer(watermark);
};
Read more about the importance of branding: https://blog.eyeson.com/building-a-strong-brand-identity-through-video-calls-5-tips
Use layer.writeFile('./preview.png') to save the image in order to see a preview and check the result.
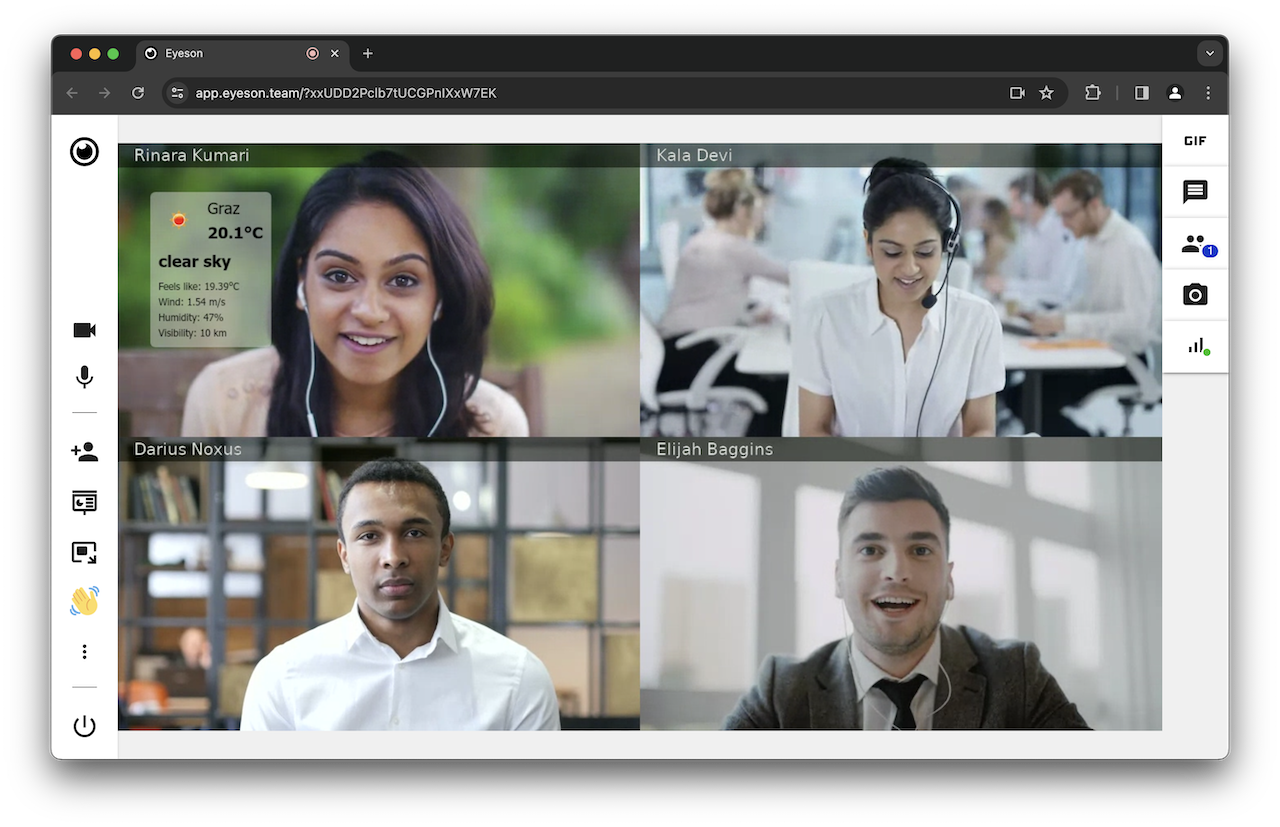
Example live weather data
Fetch live data and create an overlay image on-the-fly. The following example is based on the OpenWeather API.
import Eyeson from '@eyeson/node';
import EyesonLayer from '@eyeson/node-layer';

const eyeson = new Eyeson({ apiKey: '<YOUR API-KEY>' });

const fetchWeatherData = async location => {
    // https://openweathermap.org/api/geocoding-api
    // https://openweathermap.org/current
    const key = process.env.OPENWEATHERMAP_KEY;
    let response = await fetch(`https://api.openweathermap.org/geo/1.0/direct?q=${location}&limit=1&appid=${key}`);
    let data = await response.json();
    if (!response.ok) {
        throw new Error(data.message);
    }
    response = await fetch(`https://api.openweathermap.org/data/2.5/weather?lat=${data[0].lat}&lon=${data[0].lon}&units=metric&appid=${key}`);
    data = await response.json();
    if (!response.ok) {
        throw new Error(data.message);
    }
    return data;
};

const createWeatherOverlay = async weatherData => {
    const { name, weather, main, wind, visibility } = weatherData;
    const layer = new EyesonLayer({ widescreen: true });
    const image = await layer.loadImage(`https://openweathermap.org/img/w/${weather[0].icon}.png`);
    let font = '20px Tahoma';
    let fontColor = '#000';
    let textWidth = 0;
    const textStack = [];
    // helper function to measure text size before drawing the background box
    const addText = (text, font, color, x, y, leftMargin = 0) => {
        const measuredWidth = layer.measureText(text, font).width + leftMargin;
        textStack.push({ text, font, color, x: x + leftMargin, y });
        if (measuredWidth > textWidth) {
            textWidth = measuredWidth;
        }
    };
    addText(name, font, fontColor, 50, 70, image.width + 10);
    font = 'bold 20px Tahoma';
    addText(`${main.temp}°C`, font, fontColor, 50, 100, image.width + 10);
    addText(weather[0].description, font, fontColor, 50, 135);
    font = '12px Tahoma';
    addText(`Feels like: ${main.feels_like}°C`, font, fontColor, 50, 170);
    addText(`Wind: ${wind.speed} m/s`, font, fontColor, 50, 189);
    addText(`Humidity: ${main.humidity}%`, font, fontColor, 50, 208);
    addText(`Visibility: ${Math.round(visibility/1000)} km`, font, fontColor, 50, 227);

    layer.addRect(40, 60, textWidth + 20, 190, 6, '#d9d9d980');
    await layer.addImage(image, 50, 70);
    textStack.forEach(({ text, font, color, x, y }) => {
        layer.addText(text, font, color, x, y);
    });
    return layer;
};

const run = async () => {
    const user = await eyeson.join('<USERNAME>');
    const weatherData = await fetchWeatherData('Graz, AT');
    const overlay = await createWeatherOverlay(weatherData);
    await user.sendLayer(overlay);
};
Read more about enhancing the meeting experience: https://blog.eyeson.com/how-to-add-weather-widgets-to-an-eyeson-video-call
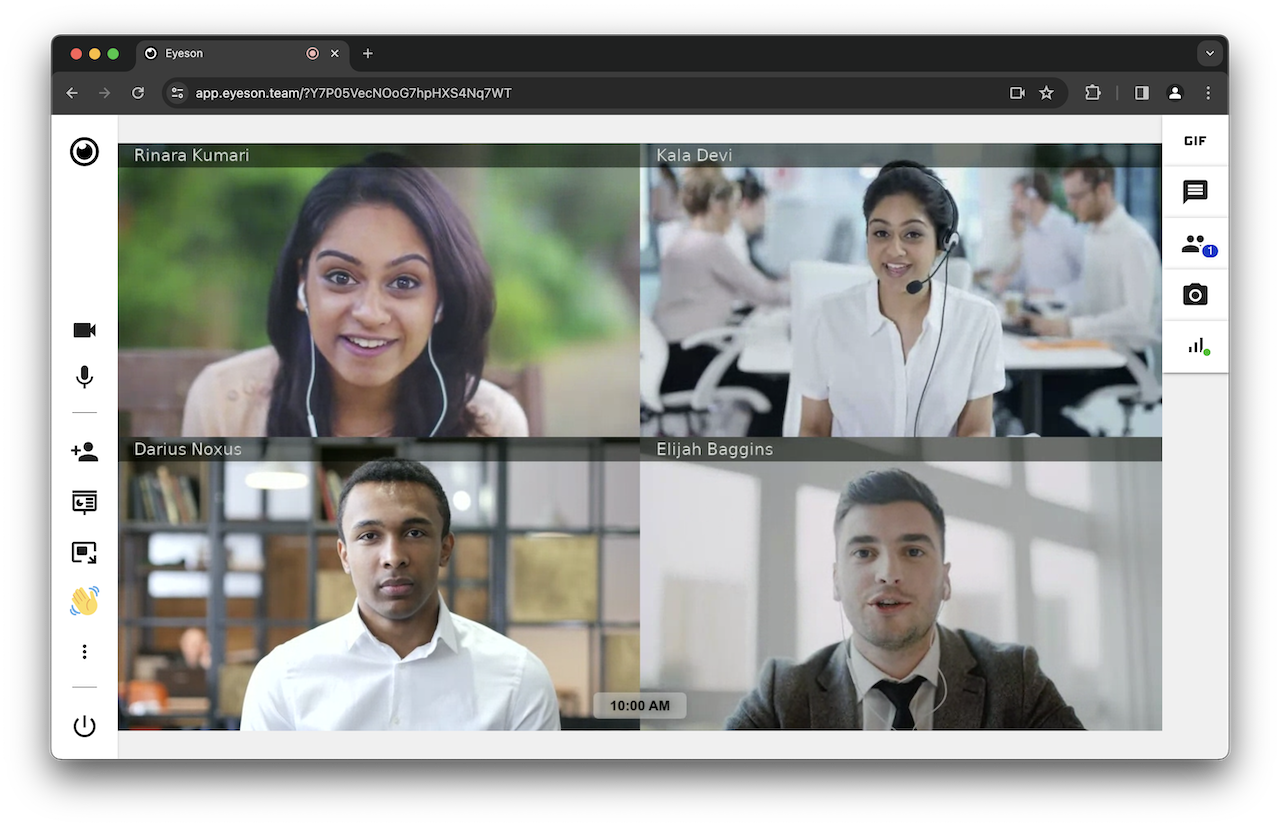
Example dynamic clock
The next example demonstrates a great feature of the EyesonLayer library: re-using objects and just update one of its parameters.
In this case, the addTextBox() function is used which creates a background box behind a text with padding and smart positioning using the origin parameter "bottom center" for the given X and Y coordinates.
import Eyeson from '@eyeson/node';
import EyesonLayer from '@eyeson/node-layer';

const eyeson = new Eyeson({ apiKey: '<YOUR API-KEY>' });

const run = async () => {
    const overlay = new EyesonLayer({ widescreen: true });
    const font = 'bold 17px Arial';
    const fontColor = '#000';
    const backgroundColor = '#d9d9d980';
    const borderRadius = 6;
    const padding = [10, 20]; // top-bottom, left-right
    const x = overlay.width / 2;
    const y = overlay.height - 15;
    const origin = 'bottom center';

    const timeString = new Date().toLocaleTimeString('en', { timeStyle: 'short' });
    const timeBox = overlay.addTextBox(timeString, font, fontColor, x, y, origin, padding, null, borderRadius, backgroundColor);

    const user = await eyeson.join('<USERNAME>');
    await user.sendLayer(overlay);

    setInterval(async () => {
        const timeString = new Date().toLocaleTimeString('en', { timeStyle: 'short' });
        timeBox.text = timeString;
        await user.sendLayer(overlay);
    }, 60 * 1000); // update every minute
};
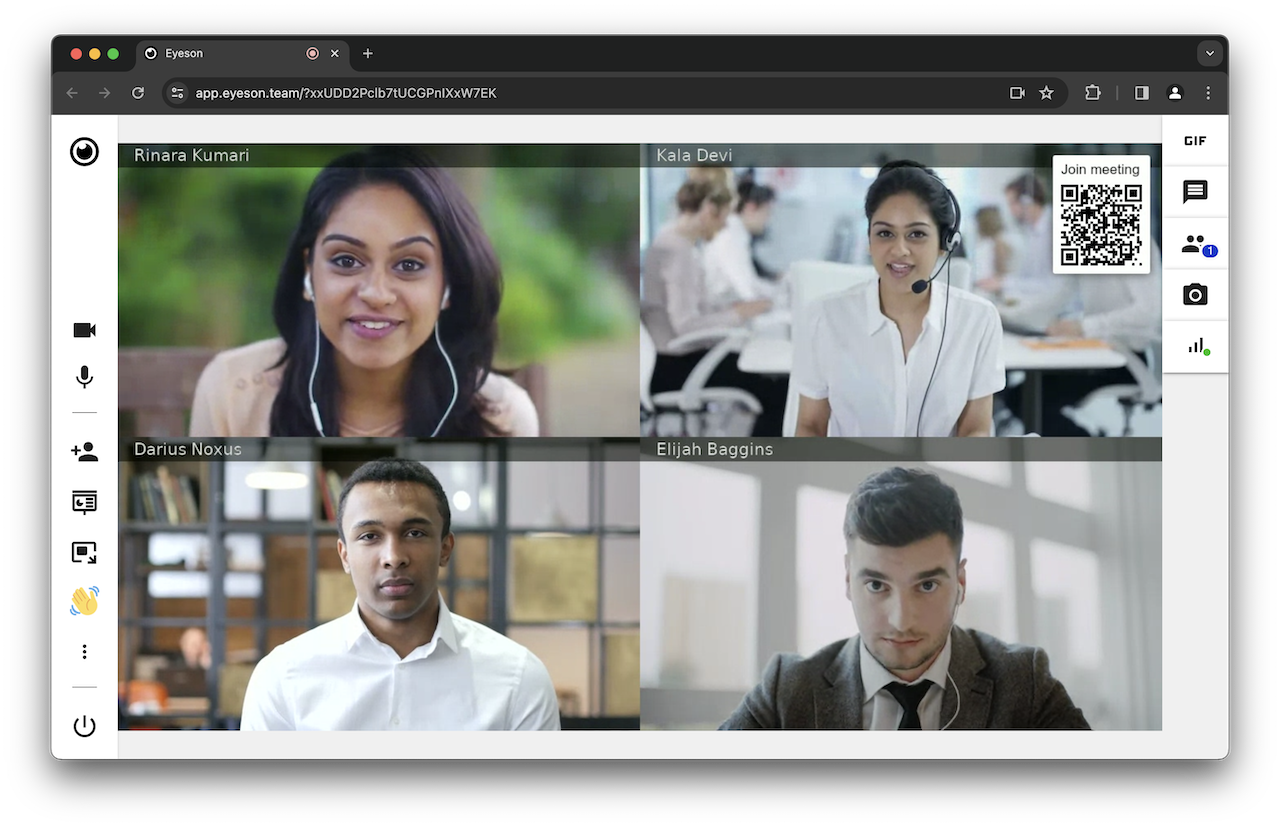
Example QR-Code with meeting guest-link
The library even plays nicely together with other tools, in this case qr-image, a node QR Code generator.
Please note that the QR Code is rendered with the actual guest-link of the currently generated meeting!
The QR Code image buffer is fed into the loadImage() function to comfortably perform calculations for positioning.
import Eyeson from '@eyeson/node';
import EyesonLayer from '@eyeson/node-layer';
import qr from 'qr-image';

const eyeson = new Eyeson({ apiKey: '<YOUR API-KEY>' });

const createQROverlay = async link => {
    const layer = new EyesonLayer({ widescreen: true });
    const qrBuffer = qr.imageSync(link, { type: 'png', margin: 0, size: 3 });
    const qrImage = await layer.loadImage(qrBuffer);
    const margin = 15;
    const padding = 10;
    const font = '17px Arial';
    const fontColor = '#000';
    const text = 'Join meeting';
    const textSize = layer.measureText(text, font);
    const textHeight = Math.abs(textSize.actualBoundingBoxAscent) + Math.abs(textSize.actualBoundingBoxDescent);
    const rectWidth = qrImage.width + 2*padding;
    const rectHeight = qrImage.height + textHeight + 3*padding;
    // put qr code in top right corner
    const x = layer.width - rectWidth - margin;
    const y = margin;
    layer.startShadow(10, 0, 0, '#444');
    layer.addRect(x, y, rectWidth, rectHeight, 3, '#fff');
    layer.endShadow();
    layer.addText(text, font, fontColor, x + padding, y + padding);
    await layer.addImage(qrImage, x + padding, y + 2*padding + textHeight);
    return layer;
};

const run = async () => {
    const user = await eyeson.join('<USERNAME>');
    // use current guest link from meeting data
    // see https://docs.eyeson.com/docs/rest/references/room
    const overlay = await createQROverlay(user.data.links.guest_join);
    await user.sendLayer(overlay);
};
Custom fonts
The "canvas for node" library includes a function to register custom fonts for later usage.
import EyesonLayer from '@eyeson/node-layer';

EyesonLayer.registerFont('./fonts/NotoColorEmoji-Regular.ttf', 'Noto Emoji');

const layer = new EyesonLayer();
layer.addText('😃🎉', '50px "Noto Emoji"', '#000', 50, 150);
(NotoColorEmoji font: https://fonts.google.com/noto/specimen/Noto+Color+Emoji)
Contact
We'll be happy to hear from you!
If you have a question or want to share any feedback, do not hesitate to create a ticket on GitHub.