How to Update the Overlay Image
Eyeson offers you the ability to display any data content inside a video stream and that includes images. The layers endpoint supports PNG, WebP & SVG files.
This example will include:
- javascript
- simple
canvas APIuses - custom layout mapping in eyeson
- requests to eyeson
- updating overlay images in an interval
Preview
The main goal of this example is to constantly update the overlay image with different content. To achieve that, we create a countdown system, apply it to a drawing function, and send the extracted image to Eyeson whenever a new countdown value is set. If you complete all the steps successfully, you may get this as a result.
Canvas API
In this section, we are going to generate a transparent PNG using the canvas's toBlob method. But first, let's create a simple image on the canvas that displays a short text and a countdown.
const cnv = document.getElementById('canvas-countdown');
const ctx = cnv.getContext('2d');
cnv.width = 1280;
cnv.height = 720;

const drawCountdown = async (value) => { // "value" represents the current countdown number
  ctx.clearRect(0, 0, cnv.width, cnv.height);
  ctx.textAlign = "center";
  ctx.textBaseline = "middle";

  const label = "Changing Layout in:";
  const countdown = value.toString();

  // Calculate dimensions for the background rectangle based on the text size
  ctx.font = `${40}px Arial`;
  const labelWidth = ctx.measureText(label).width;
  ctx.font = `${200}px Arial`;
  const countdownWidth = ctx.measureText(countdown).width;
  const rectWidth = Math.max(labelWidth, countdownWidth) + 2 * 40;
  const rectHeight = 40 + 20 + 200 + 2 * 40; // label height + line space + countdown height + 2*padding

  //Center the background reactangle
  const rectX = (cnv.width - rectWidth) / 2;
  const rectY = (cnv.height - rectHeight) / 2;

  // Draw a semi-transparent background rectangle with rounded corners
  ctx.fillStyle = "rgba(255, 0, 0, 0.5)";
  ctx.beginPath();
  ctx.roundRect(rectX, rectY, rectWidth, rectHeight, 20);
  ctx.fill();

  // Draw the label text
  ctx.fillStyle = "white";
  ctx.font = `${40}px Arial`; // Reset font to 40px for the label
  ctx.fillText(label, cnv.width / 2, rectY + 40 + (40 / 2));

  // Draw the countdown number
  ctx.font = `${200}px Arial`;
  ctx.fillText(countdown, cnv.width / 2, rectY + 40 + 40 + (200 / 2) + 20);

  await sendImage(); // Send the drawn canvas image to Eyeson
};
If you download the canvas via cnv.toDataURL('image/png') with value=5, this is the result:

Custom Layout
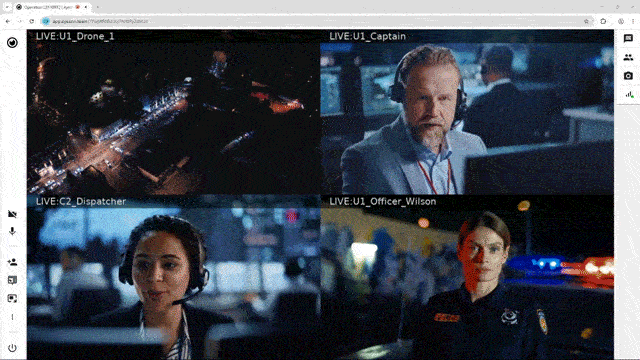
At the end of the countdown, a fancy custom layout should be set. Eyeson provides various layouts for the layouts endpoint, but you can also create your own layout with the map parameter. For more information, read this section.
const setLayout = async () => {
  if (!access) return;
  try {
    const url = `https://api.eyeson.team/rooms/${access}/layout`;
    const custom_map = JSON.stringify([
      [0, 0, 1280, 540, "cover"], // "cover" = fills the main spot by scaling up the video
      [0, 540, 426, 180, "cover"],
      [426, 540, 426, 180, "cover"],
      [852, 540, 428, 180, "cover"]
    ]);

    const formData = new FormData();
      formData.set('voice_activation', 'false');
      formData.set('layout', 'auto');
      formData.set('name', 'custom');
      formData.set('map', custom_map);
      // Append empty values for users to match the layout map
      formData.append('users[]', '');
      formData.append('users[]', '');
      formData.append('users[]', '');
      formData.append('users[]', '');

    const response = await fetch(url, { method: 'POST', body: formData });
    if (!response.ok) {
      throw new Error('Failed to set layout');
    }
  } catch (error) {
    alert(error.message);
  }
};
access is the access key of your current meeting. You can retrieve it by requesting it, or by using the last 25 characters of your meeting room link.
The layout dimensions and coordinates look likes this:

Requests to Eyeson
Now that we have a canvas image and a custom layout setting, we can try sending the image to Eyeson. Additionally, we need to remove the previous canvas images from the meeting once the countdown ends.
const sendImage = async () => {
  if (!access) return;
  try {
    const url = `https://api.eyeson.team/rooms/${access}/layers`;
    const blob = await new Promise(resolve => cnv.toBlob(resolve)); // Converts canvas content to binary data

    const formData = new FormData();
      formData.set('file', blob, 'overlay.png');
      formData.set('z-index', '1');

    const response = await fetch(url, { method: 'POST', body: formData });
    if (!response.ok) { throw new Error('Failed to send image'); }
  } catch (error) {
    alert(error.message);
  }
};

const deleteImage = async () => {
  if (!access) return;
  try {
    await fetch(`https://api.eyeson.team/rooms/${access}/layers/1`, { method: 'DELETE' });
  } catch (error) {
    alert(error.message);
  }
};
Update Overlay Image
We want to send an image every second. Since the image sending process takes less than one second, we need to calculate the remaining time. A simple for loop is used for the countdown.
const startCountdown = async (value) => {
  if (!access) return;
  try {
    if (isNaN(value) || value < 3) value = 3; // Ensure the countdown value is at least 3

    for (let i = value; i >= 0; i--) { // Loop from the starting value down to 0
      const startTime = performance.now(); // Record the current high-resolution time in milliseconds
      await drawCountdown(i); // Draw the countdown image with the current value
      const elapsedTime = performance.now() - startTime;
      const waitTime = Math.max(1000 - elapsedTime, 0);
      await new Promise(resolve => setTimeout(resolve, waitTime)); // Wait until 1000ms have elapsed since startTime before continuing
    }
  } finally {
    await setLayout(); // Set the custom layout after the countdown completes
    await deleteImage(); // Remove the last canvas image from the meeting
  }
};
Download
We've prepared a full working example that contains the code shown in this section and also additional functions to make the process smooth.
Download eyeson-canvas-overlay-example.zip